
Article
A Deep Dive into Table partitioning 🐰 Part 3: Maintenance Under Pressure
By Derk van Veen (Database Engineer) & Cosmin Octavian Pene(Java Engineer), Adyen.
In our previous article for this series, we discussed how we do maintenance on partitioned tables, where uptime is our biggest priority. To help you accomplish the same without the same amount of work, we shared all the functions we created over time in our public GitHub account. Minimizing the impact of partition maintenance on the application locking is a very important concept to understand. In this article we go through some very basic locking principles, and how they apply to partitioning. We zoom in on a few situations where locking caused us some challenges, and how we mitigated them; for example, when attaching new partitions, or having to deal with the infamous default partition.
Locking
Working with table partitioning within Adyen is often related to locking - to be precise, preventing locking. Our tables are being used 24/7, so there is no such thing as "outside office hours.". Achieving close to zero downtime is our top priority, and this means all maintenance has to be done while the tables remain available. In most cases, it is not possible to lock the table for more than a few seconds.
Introduction to Locks
Locking in databases is surprisingly complicated. In this section, we will only give you a very brief introduction on why locks are important when it comes to partitioning.
In the context of partitioning, locks are dual purposed:
Locks protect the table structure from being altered or deleted while transactions are reading from or writing into this table.
Locks prevent data from being written to the wrong partition.
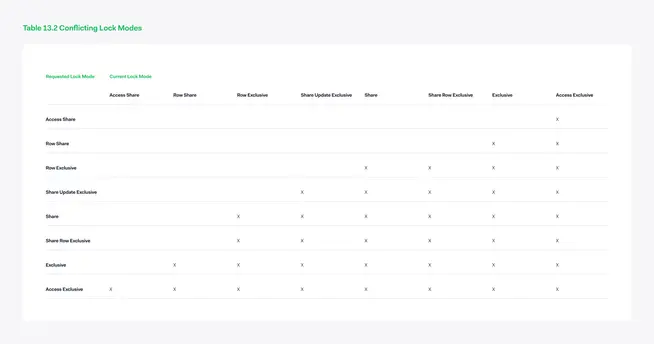
Some locks are very weak, such as the ACCESS SHARE lock; they don’t interfere with many other lock modes, and in effect, other transactions have no problems accessing the same pages. On the other hand, there is the ACCESS EXCLUSIVE lock which is very heavy. It interferes with all the other lock modes, effectively blocking any other transaction that comes in. This is the lock you need when you want to modify the table structure, or when validating data. While a table is locked with an ACCESS EXCLUSIVE lock, nobody else can even read from this table.
An example of a very light lock mode is ACCESS SHARE. This is the lock you get when reading from a table, and this lock mode only interferes with the ACCESS EXCLUSIVE lock. You can read this as “while I am reading from this table, nobody is allowed to change the table structure or delete the table”. But, since it doesn’t interfere with any other lock modes, it is possible for other users to read from the same table or update rows. The table below contains an overview of all lock modes and which modes interfere with each other.
You can find a great guide about locking modes and transactions on the official PostgreSQL documentation at: Transaction Processing in PostgreSQL.
There is one important thing to realize when dealing with locks: they last until the end of your transaction, not the end of your statement. If a transaction starts with reading from a table and then does some work on another table, the ACCESS SHARE lock on the first table is not released. Only at the end of the transaction will all locks associated with it be released. Understanding this will not only give a better idea on how or why transactions are waiting for each other, but it could also prevent you from acquiring expensive locks in long running transactions, which in effect will have a performance penalty for all other queries coming in.
Lock, release and retry
When working with partitions, a lot of locks are involved. Fortunately, the locking mechanism is very easy to understand. It is a queue, and the queue is handled request by request, at the order in which they came in.
When a transaction is queued with a request for a heavy lock, all transactions that would interfere with your lock are queued behind that request. When you need an ACCESS EXCLUSIVE lock, you have to wait for all running transactions on the table; you have to wait for the longest running transaction to finish before you can get the lock. At the same time all incoming transactions on this table are being blocked by your request for the heavy lock. Since we don’t want to block incoming transactions for too long, we use a retry mechanism. In pseudo code this would translate in:
        Set a lock timeout
Loop
Try to get the lock(s)
Catch the lock timeout exception
	Sleep for some time
Retry
End Loop

– – Do your planned work
Even though it is a nice way to circumvent blocking the application for longer than a set time, it is best to minimize locking in the first place. Make sure you have everything prepared in a script that was ideally tested beforehand, so the whole procedure could be done in a split second while taking a bit of time to validate the effects of the script. It goes without saying, but when you absolutely need a lock, try to use the lightest one possible. This will prevent you from paying a performance penalty for other queries that are coming in.
In the following sections we describe how we minimize locking.
Adding new partitions and locks
As discussed in the previous article, there are two ways of adding a new partition to a natively partitioned table.
The first option is to do it in one command
        CREATE TABLE test_partition_30_40 PARTITION OF test_partition
    FOR VALUES FROM ('30') TO ('40');
And the second option is to do it in two separate statements
        CREATE TABLE test_partition_30_40 (LIKE test_partition INCLUDING ALL);
ALTER TABLE test_partition ATTACH PARTITION test_partition_30_40 FOR VALUES FROM ('30') TO ('40');
The first option requires an ACCESS EXCLUSIVE lock on the parent table, while the second option requires an ACCESS SHARE lock for creating a table like the parent table and a SHARE UPDATE EXCLUSIVE lock. The end result is completely the same but the impact of both methods from application perspective is different - the first method heavily impacts the application, while the second method does not.
The first method requires us to wait for all running transactions related to this table to finish, while blocking all incoming transactions to this table, while the second method is hardly noticed by the application. This difference made me worry about missing something important and I feared that data would end up in the wrong partition because of these weaker locks.
I contacted our support partner for PostgreSQL about this, and I really like the answer I got: “Both methods are safe, but downscaling the lock for the first option is hard in the code, and nobody wanted to do it since we already have a good working solution”. The answer came with an invitation to fix it myself, but I had to agree it was not that easy to fix. If you are reading this and feel like this should be fixed, please see this as an invitation 🙂. Now that we know it is safe to use the second method, you are probably thinking that we can forget about the first one…but there is more to the story. When you add a new partition to a partitioned table, the database has to make sure the table doesn’t contain any data violating the partition boundaries. The only way to do this is to lock the table with an ACCESS EXCLUSIVE lock to prevent anything from happening to this table and scan the content. But we can do better than this, can’t we?
The following is a simple trick that will prevent PostgreSQL from scanning the table:
Before we attach a new partition to a partitioned table, we create a check constraint on the table, matching the partition boundaries. With this check constraint in place, the database can easily see the table doesn’t contain any data violating the partition boundaries, and in effect, the sequential scan- including the heavy lock- is skipped.
After attaching the table to the partitioned table, we can safely remove the redundant check constraint. The partition boundaries are now enforced by partition constraints, making our own check obsolete. Leaving it in place brings no benefit, and furthermore, has even a (very) slight negative impact on performance.
The default partition is the root of all evil with respect to partitions
We already discussed the default partition in the first article. The default partition is like the catch all when you are inserting data in your parent table. If your data doesn’t fit in any existing partition, it can still be placed in the default partition. This way you prevent the application from crashing, without even knowing there were no designated partitions available.
Such a safety net is really nice, especially when you start working with partitions and you are not sure whether you can keep track of all new partitions you need to create – at least that is why we created them at the beginning of our partitioning adventure. It all sounds like a great idea, but the safety net in the form of the default partitions comes with a heavy price tag with respect to maintenance. Let's take a step back and start with partition boundaries. Every partition has partition boundaries. In this example the partition boundaries are given at the top of every partition. The first partition, for instance, can contain values from 1 to 9 (as the upper boundary is excluded).

Just like all other partitions, the default partition also has a constraint in place, enforcing the partition boundaries. This constraint accepts everything, but excludes all the other partition constraints. For this table in the diagram above, the check constraint on the default partitions looks like this:
        Partition of: test_partition DEFAULT
Partition constraint: (NOT ((id IS NOT NULL) AND (((id >= '0'::bigint) AND (id < '10'::bigint)) OR ((id >= '10'::bigint) AND (id < '20'::bigint)) OR ((id >= '20'::bigint) AND (id < '30'::bigint))
Every time a partition is added or removed, the constraint on the default partition has to be updated as well…but that is not the end of the story: Before adding a new partition to a partitioned table with a default partition, this default partition might contain data that could belong to the added partition. For example, the default partition might contain value 35 at the moment a new partition is added for values from 30 to 40. So, naturally, the database has to check this to prevent partition constraint violations. As you might expect, the only way to check this is to do a full table scan on the default partition with an ACCESS EXCLUSIVE lock on the default partition to stop new data coming in. Now our safety net is suddenly preventing us from easily adding new partitions to our partitioned table. Because of it, we now need an ACCESS EXCLUSIVE lock every time when attaching new partitions. So much about minimizing locks! Spoiler question: Do you think this is all the locking that is involved? Stay tuned for our next article where we really push the DEFAULT partition to its limits. After all, that’s what we do at Adyen, pushing the boundaries of PostgreSQL until we make it work for our use cases.
Converting the default partition to an ordinary partition
As mentioned, the initial idea was to create the default partition as a safety net, so the application can always insert new data into the table. No one enjoys their applications crashing because of database issues. But what can we do? We need the default partition right? We are willing to pay the price! After all, it’s just harder maintenance, right? NO! We are definitely not willing to pay the price! We have a growing default partition, which could get out of our control fairly quickly, and attaching new partitions is very challenging! Yes, the application is still running, but on the database side we are not happy at all. So now it’s settled, we don’t want DEFAULT partitions, they bring a whole set of downsides. But what can we do with the DEFAULT partitions we already have?
It took us a while, but in the end we were able to convert the default partition to an ordinary partition with very minimal impact for the application. Not an easy problem to tackle, but certainly an exciting one.
Converting the default partition into an ordinary partition is, in principle, an easy task, but there might be complications. The default partition is an ordinary table attached to a parent table with special partition constraints - as described in the previous section.
In order to convert the default partition into an ordinary partition we need to
Lock the parent table.
Detach the partition from the parent.
Check the content of the table.
Add a check constraint matching the content of the table, or the new partition boundaries.
Attach the table as an ordinary partition.
Remove the check constraint from the partition.
All of these actions can be executed very quickly and as soon as you acquire the lock on the parent table - provided you add the check constraint as not valid, and then update the catalog. If you don’t know about this trick that we are heavily using at Adyen, make sure to check our previous article or, even better, our public GitHub repository. All we do is update the catalog without moving or even reading the data.
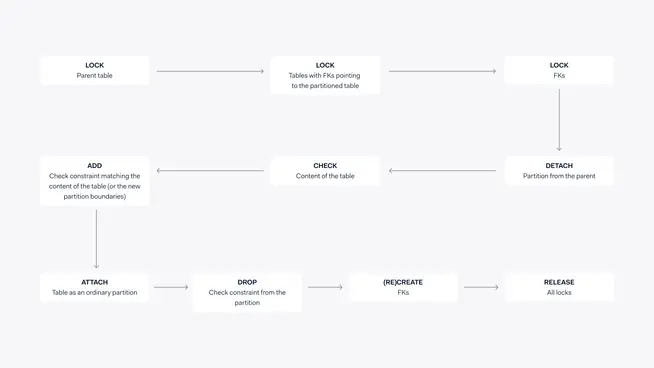
A complicating factor can be the existence of foreign keys pointing to our partitioned table. When a foreign key is pointing to a partitioned table, you can’t just detach a partition; you would be left with invalid references. We should handle this complication before we tackle the partition conversion. We are not changing any data, we just want a partition with different partitioning constraints. Since we don’t change the data, we can safely drop the foreign key, as long as we guarantee the data doesn’t change. We must guarantee this by locking the table with the foreign key before dropping the foreign key. With all foreign keys gone, we can finally work on our partitioned table. After attaching the partition with new partition constraints, we have to recreate the foreign keys we dropped in the first step. But since we know the data didn’t change, enforced by locks on both parent and child side of the foreign key, we can add the foreign key as invalid and then update the catalog to mark them as valid (really, we make use of this trick every time, and it works like a charm). Only at this point can the locks be released! The process now follows these steps:
Lock the parent table
Lock the tables with foreign keys pointing to the partitioned table
Drop incoming foreign keys
Detach the partition from the parent
Check the content of the table
Add a check constraint matching the content of the table, or the new partition boundaries
Attach the table as an ordinary partition
Remove the check constraint from the partition
Recreate foreign keys
Release all locks
A sample script to convert a default partition into an ordinary partitions could look like this example:
        begin;
-- Lock tables
lock table public.ref in exclusive mode;

-- Drop foreign keys
alter table public.ref drop constraint ref_fkey;

-- detach default partition (locks the parent table in exclusive mode)
alter table public.test_partition detach partition public.test_partition_default;

-- Rename partition
alter table public.test_partition_default rename to test_partition_10_25;

-- Add the check constraint
alter table public.test_partition_10_25 add constraint test_partition_10_25_constraint CHECK (id >= 10 AND id <25) NOT VALID;
update pg_constraint pgc
SET convalidated = true
FROM pg_class c
    WHERE
        c.oid = pgc.conrelid
        AND connamespace = 'public'::regnamespace::oid
        AND c.relname = 'test_partition_10_25'
        AND conname = 'test_partition_10_25_constraint';
alter table public.test_partition attach partition public.test_partition_10_25 FOR VALUES FROM (10) TO (25);

-- create a new partition with the desired range.
create table public.test_partition_25_35 (like public.test_partition including all);
alter table public.test_partition attach partition public.test_partition_25_35 FOR VALUES FROM (25) TO (35);

-- Recreate the foreign key
alter table public.ref add constraint ref_fkey FOREIGN KEY (id) REFERENCES public.test_partition(id) NOT VALID;
update pg_catalog.pg_constraint set convalidated = true where conname = 'ref_fkey';

– commit (release all locks)
commit;
Drop the default partition
Dropping the empty default partition is relatively easy. However, we still take very good care of what we do. This is our procedure for dropping the default partition:
Check is the default partition is indeed empty
Detach the default partition from its parent
Check again whether the former default partition is still empty
Drop the former default partition
Summary
Locking is one of the critical mechanisms in place to protect the integrity of your data in an ACID database, but when optimizing for optimal concurrency they can be an obstacle. Navigating this challenge requires a good understanding of the different lock types and why the database enforces them. Only when you understand why a certain lock is enforced can you start working on a solution.
In this, and the previous article, we showed some workarounds by adding custom constraints, or even updating the catalog. When you go through our partition library, you will find more examples. We can only do this because we put a lot of research into the matter, and fully understand what we are doing.