Guides and reports
Faster and Simpler integration with a single API call
By Julien Lengrand-Lambert, Developer Advocate, Adyen

Tl;DR : Starting with version 5.0.0 of our Drop-in and Components, a single API call will be enough to create an integration. No action is required for existing merchants.
At Adyen, we make online payments easy for merchants while providing many methods of payment. Starting with version 5.0.0 of our Drop-inand Components, the number of API calls needed when integrating will be reduced from three to only one.
To achieve this, we introduce the concept of payment sessions that are used by the web client to render the checkout for the shopper and to make all the required API requests (to internal endpoints) to complete the payment flow. This is what we will dive into in detail in this blog.
Introducing the /sessions endpoint
Version 5.0.0 of the Drop-in and Component UI elements (and their corresponding release 68 of the Checkout API ) come with an additional orchestration layer that will massively simplify your integration efforts. From your application server, only one API call will now be required : a POST request to the /sessions endpoint with payment information. All the complexity will be handled directly by the Adyen frontend components for you.
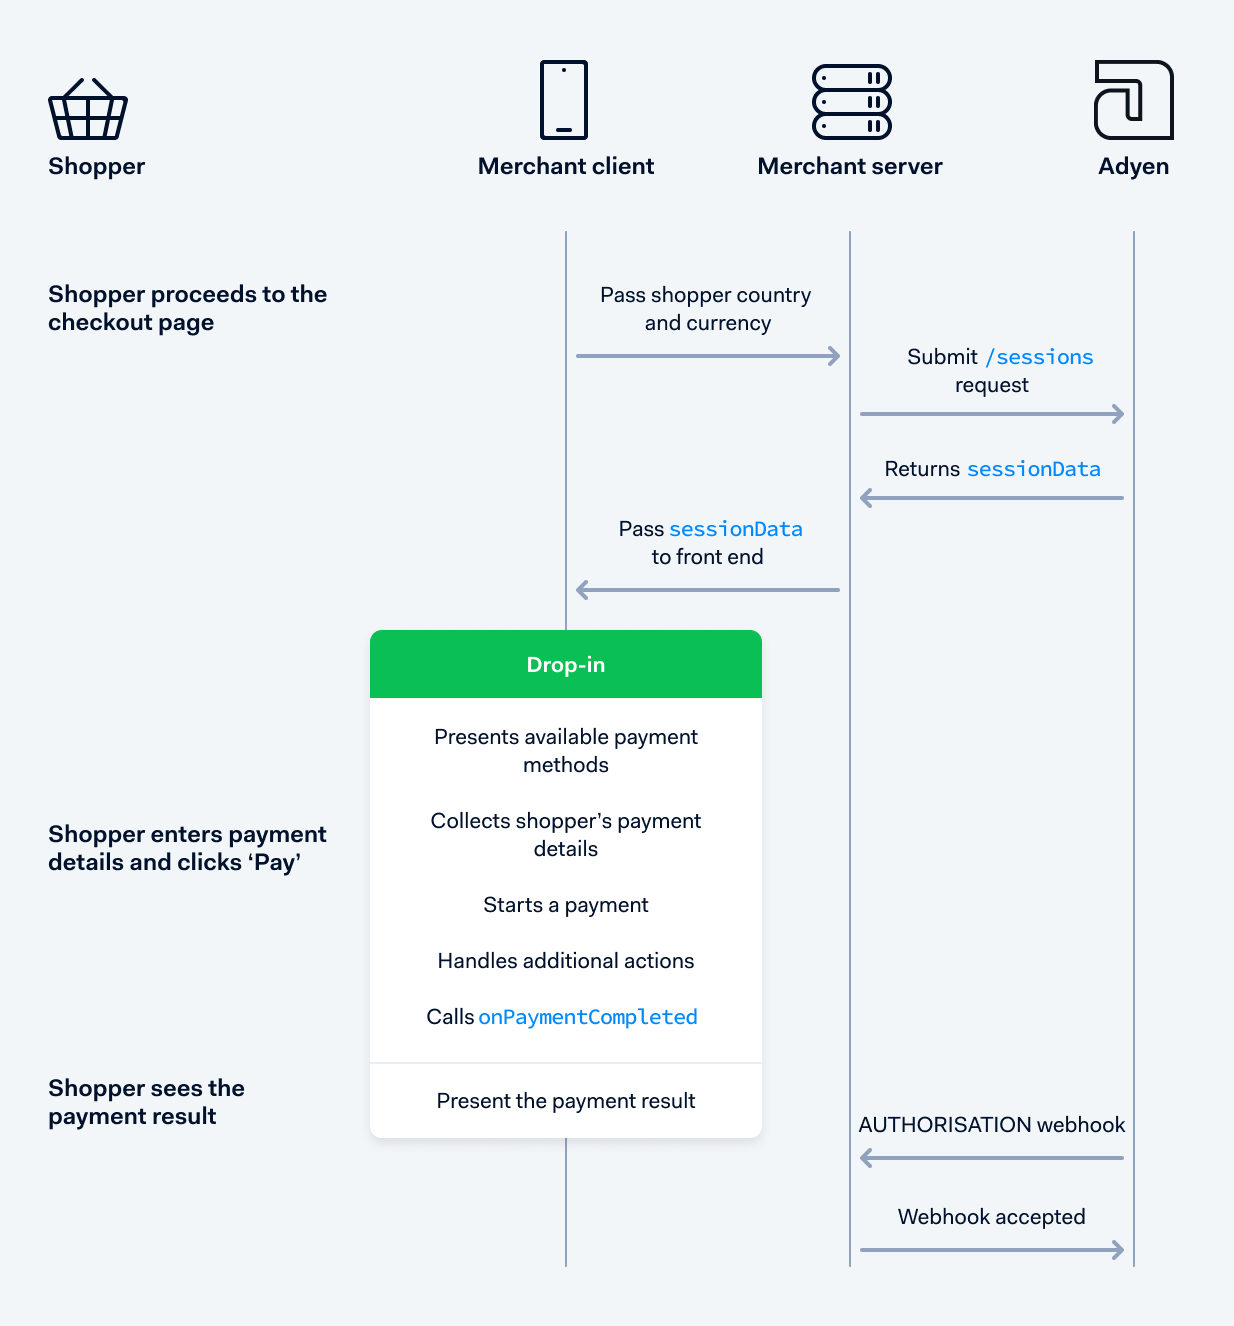
This is how the checkout flow looks like :

A sequence diagram of Adyen's checkout flow
Highlights of an example integration
Let's dive into the key elements needed to create an integration using the simplified checkout and the Drop-in interface. This is not a complete guide, but rather a highlight of the important parts of the process. You can find the complete documentation for integrationshere. We also offer multiple examples of complete example integration for many languageson GitHub.
Prerequisites : We'll need our API Key and Merchant account on our server side, as well as our client key on our client side. We'll also need a return URL, which will be used to return payload once it has been processed so that the API response can come back to us once everything has been processed properly.
The first thing we do is pass the customer’s preliminary data and initiate the payment session on the backend. As a curl request, it could look like this for a payment of 5€.
    curl https://checkout-test.adyen.com/v68/sessions \
-H "x-API-key: YOUR_X-API-KEY" \
-H "content-type: application/json" \
-d '{
   "merchantAccount":"YOUR_MERCHANT_ACCOUNT""amount":{
      "value":500,
      "currency":"EUR"
   },
   "reference":"YOUR_PAYMENT_REFERENCE",
   "countryCode":"NL",
   "returnUrl":"YOUR_RETURN_URL"
}'
Of course, those requests are usually embedded inside the back-end of your application. Here is the same example using the latest release ofour Java library.
    Client client = new Client("Your X-API-KEY", Environment.TEST);

private Checkout checkout = new Checkout(client);

CreateCheckoutSessionRequest checkoutSessionRequest = new CreateCheckoutSessionRequest();
Amount amount = new Amount();
amount.setCurrency("EUR");
amount.setValue(500L);
checkoutSessionRequest.setReference("YOUR_PAYMENT_REFERENCE");
checkoutSessionRequest.setAmount(amount);
checkoutSessionRequest.setMerchantAccount("YOUR_MERCHANT_ACCOUNT");
checkoutSessionRequest.setReturnUrl("YOUR_RETURN_URL");

CreateCheckoutSessionResponse checkoutSessionResponse = checkout.sessions(sessionRequest);
Our Checkout API will initiate a session, and return important information. It is formatted like this:
    const session ={
   "amount":{
      "currency":"EUR",
      "value":500
   },
   "countryCode":"NL",
   "expiresAt":"2021-08-24T13:35:16+02:00",
   "id":"CSD9CAC34EBAE225DD",
   "merchantAccount":"YOUR_MERCHANT_ACCOUNT",
   "reference":"YOUR_PAYMENT_REFERENCE",
   "returnUrl":"YOUR_RETURN_URL",
   "sessionData":"Ab02b4c..."
}
Two key pieces of information are visible here :
- The unique Id for that session
- The sessionData, which contains all the payload of the checkout in an encrypted form
We’ll pass those two pieces of information in the frontend to initiate and load the Drop-in. It looks like this:
    const checkout = await AdyenCheckout(
{
  clientKey: configurations.clientKey,
  environment: configurations.environment,
  session,
  onPaymentCompleted: (result, component) =>
  {
    console.info(result, component);
  },
  onError: (error, component) =>
  {
    console.error(error.name, error.message, error.stack, component);
  }
});
And mount it so our Drop-in gets initiated as well :
const dropin = checkout.create('dropin').mount('#dropin-container');
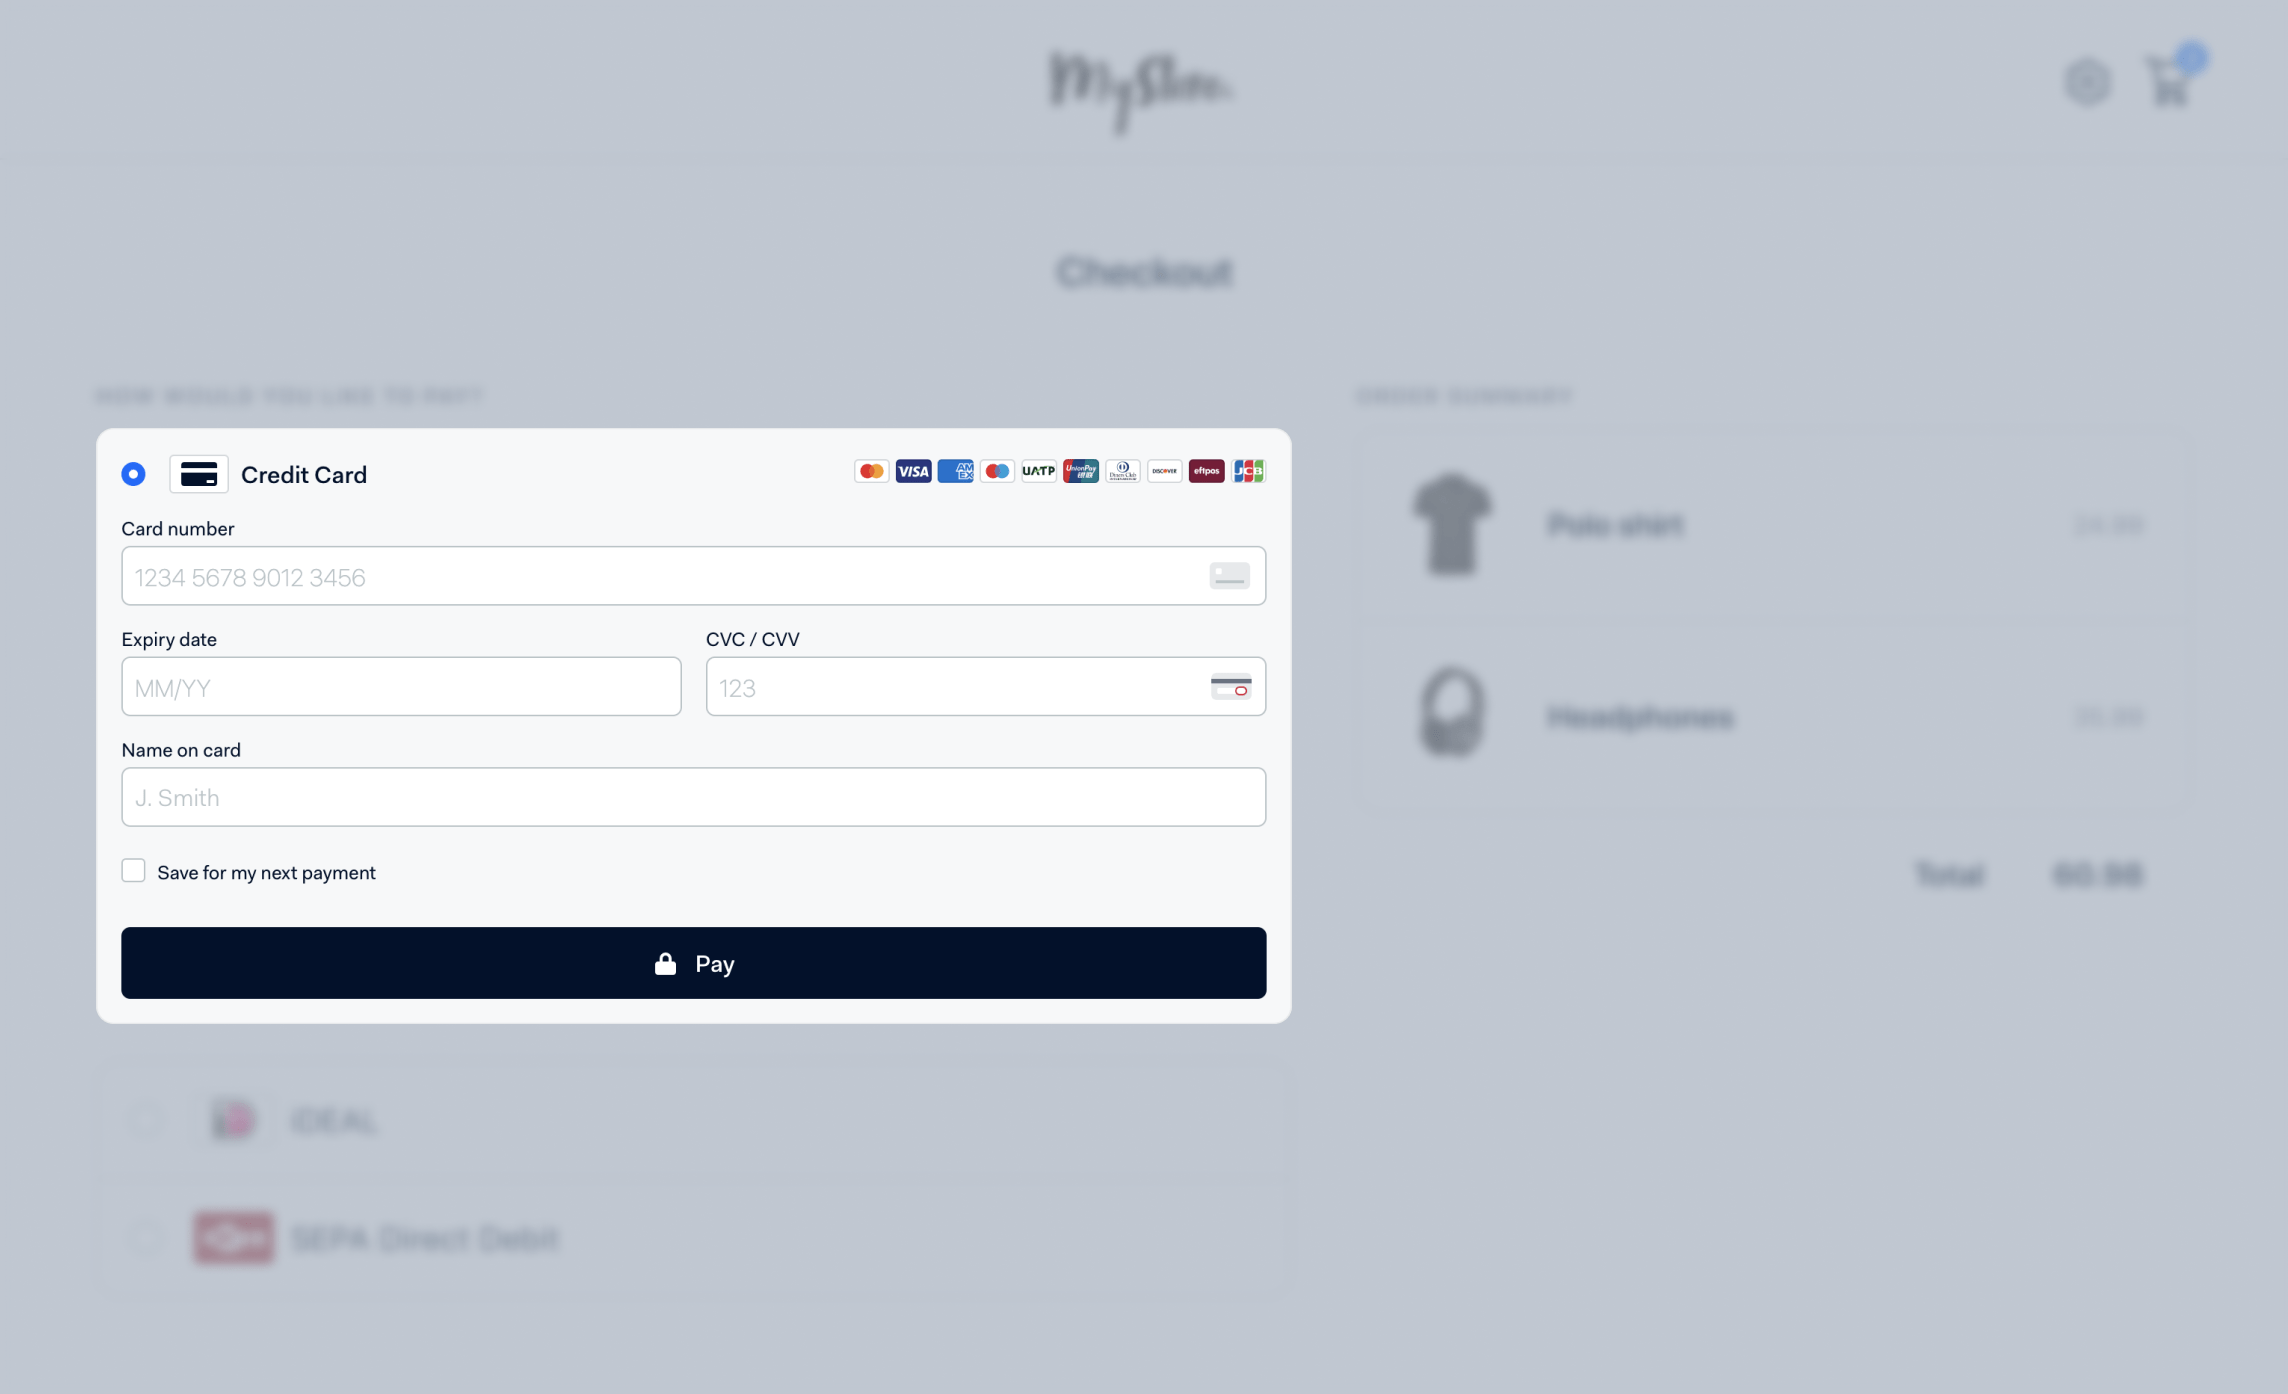
Once that is done, the checkout workflow can proceed just as usual. The customer can enjoy their payment experience, using the method of their choice.

Our Drop-in, loaded onto a webpage
A quick glance under the hood
These snippets may look underwhelming, and they should. We strive to make integrations for our merchants as effortless as possible. But as simple as this may seem, a lot happens in the background!
Indeed, a few things have to happen before processing a payment request! Under the hood, 3 API calls are actually necessary in order to process a payment:
- Getting the list of available payment methods (POST /paymentMethods)
- Make the actual payment (POST to /payments)
- Finally process payment details (usually two factor verification, 3D Secure, ...) (POST to /payments/details)
Additionally, Drop-in and components also perform a lot of heavy lifting. They validate and collect shopper details securely, make the payment request, and handle any additional actions like 3D Secure or rendering QR codes (and more). But this is a story for another blog post.
No migration required for existing merchants
As mentioned at the beginning of this post, the /sessions release is only an orchestration layer on top of existing functionalities. This means thatthe complete checkout experience is still available and existing merchants will not have to change anything to their existing workflow. In fact, the 3 step /paymentMethods, /payments, /payments/details is still the way to go for anyone deciding not to use our integrated Drop-in or Components, or for some more complex user flows.
However, there is a small breaking change when you update to Web Components/Drop-in v5.0.0. The creation ofAdyenCheckoutis now asynchronous. Here is how to apply the change:
    //before
const checkout = new AdyenCheckout(configuration);
//after
const checkout = await AdyenCheckout(configuration);
Your turn to try it out!
Our documentation pages forDrop-inandComponentshave been updated to include the new /sessions endpoint. For a complete reference, you can also dive into theAPI Explorerfor a complete reference of the endpoint.
Our API libraries have also been updated to add support for simplified checkout. A complete list of our API libraries for various languages is available onour GitHub.
Over the coming weeks, we will be updating all of our example integrations and publish updated versions of the libraries, so stay tuned for more information. In the meantime, any technical questions are welcomeon Stack Overflowor onour forum. We will be monitoring those closely for any issues or feedback.
We hope you’re as excited as us to make integrations easier and faster! Till soon